Index of /blog/wp-content/uploads/2023/03
Name
Last modified
Size
Description
Parent Directory
-
comment-saaa-optimise-ses-projets-retail-avec-bubble-plan-1.jpg
2026-05-15 10:23
81K
comment-saaa-optimise-ses-projets-retail-avec-bubble-plan-1-768x512.jpg
2026-05-15 10:23
36K
comment-saaa-optimise-ses-projets-retail-avec-bubble-plan-1-440x293.jpg
2026-05-15 10:23
16K
comment-saaa-optimise-ses-projets-retail-avec-bubble-plan-1-431x321.jpg
2026-05-15 10:23
17K
comment-saaa-optimise-ses-projets-retail-avec-bubble-plan-1-528x352.jpg
2026-05-15 10:23
20K
comment-saaa-optimise-ses-projets-retail-avec-bubble-plan-1-320x213.jpg
2026-05-15 10:23
9.0K
2-planning-des-intervenants-e1758899863534-1400x828.png
2025-09-26 17:17
256K
2-planning-des-intervenants-e1758899863534-320x189.png
2025-09-26 17:17
29K
2-planning-des-intervenants-e1758899863534-440x260.png
2025-09-26 17:17
47K
2-planning-des-intervenants-e1758899863534-2048x1212.png
2025-09-26 17:17
429K
2-planning-des-intervenants-e1758899863534-1536x909.png
2025-09-26 17:17
290K
2-planning-des-intervenants-e1758899863534-768x454.png
2025-09-26 17:17
107K
2-planning-des-intervenants-e1758899863534-528x312.png
2025-09-26 17:17
61K
2-planning-des-intervenants-e1758899863534-431x321.png
2025-09-26 17:17
53K
2-planning-des-intervenants-e1758899863534.png
2025-09-26 17:17
437K
comprendre-scrum-la-methodologie-agile-pour-une-gestion-de-projet-reussie.png
2025-06-18 17:15
536K
comprendre-scrum-la-methodologie-agile-pour-une-gestion-de-projet-reussie-768x512.png
2025-06-18 17:15
522K
comprendre-scrum-la-methodologie-agile-pour-une-gestion-de-projet-reussie-440x293.png
2025-06-18 17:15
170K
comprendre-scrum-la-methodologie-agile-pour-une-gestion-de-projet-reussie-320x213.png
2025-06-18 17:15
93K
comprendre-scrum-la-methodologie-agile-pour-une-gestion-de-projet-reussie-528x352.png
2025-06-18 17:15
243K
comprendre-scrum-la-methodologie-agile-pour-une-gestion-de-projet-reussie-431x321.png
2025-06-18 17:15
184K
2-planning-des-intervenants.png
2024-06-12 10:22
414K
2-planning-des-intervenants-2048x1280.png
2024-06-12 10:22
388K
2-planning-des-intervenants-1536x960.png
2024-06-12 10:22
259K
2-planning-des-intervenants-640x400.png
2024-06-12 10:22
73K
2-planning-des-intervenants-768x480.png
2024-06-12 10:22
97K
2-planning-des-intervenants-528x330.png
2024-06-12 10:22
58K
2-planning-des-intervenants-485x360.png
2024-06-12 10:22
55K
2-planning-des-intervenants-431x321.png
2024-06-12 10:22
48K
2-planning-des-intervenants-300x220.png
2024-06-12 10:22
30K
2-planning-des-intervenants-260x195.png
2024-06-12 10:22
25K
2-planning-des-intervenants-245x184.png
2024-06-12 10:22
23K
2-planning-des-intervenants-198x145.png
2024-06-12 10:22
17K
2-planning-des-intervenants-100x70.png
2024-06-12 10:22
6.5K
2-planning-des-intervenants-80x60.png
2024-06-12 10:22
5.0K
couverture-etude-de-cas-2021-logo-saaa-rd-merchandising-marketing-retail-logo-bubble-plan.png
2023-04-18 12:15
36K
couverture-etude-de-cas-2021-logo-saaa-rd-merchandising-marketing-retail-logo-bubble-plan-1536x864.png
2023-04-18 12:15
130K
couverture-etude-de-cas-2021-logo-saaa-rd-merchandising-marketing-retail-logo-bubble-plan-640x400.png
2023-04-18 12:15
38K
couverture-etude-de-cas-2021-logo-saaa-rd-merchandising-marketing-retail-logo-bubble-plan-640x360.png
2023-04-18 12:15
32K
couverture-etude-de-cas-2021-logo-saaa-rd-merchandising-marketing-retail-logo-bubble-plan-528x297.png
2023-04-18 12:15
27K
couverture-etude-de-cas-2021-logo-saaa-rd-merchandising-marketing-retail-logo-bubble-plan-431x321.png
2023-04-18 12:15
27K
couverture-etude-de-cas-2021-logo-saaa-rd-merchandising-marketing-retail-logo-bubble-plan-768x432.png
2023-04-18 12:15
44K
couverture-etude-de-cas-2021-logo-saaa-rd-merchandising-marketing-retail-logo-bubble-plan-485x360.png
2023-04-18 12:15
30K
couverture-etude-de-cas-2021-logo-saaa-rd-merchandising-marketing-retail-logo-bubble-plan-300x220.png
2023-04-18 12:15
15K
couverture-etude-de-cas-2021-logo-saaa-rd-merchandising-marketing-retail-logo-bubble-plan-260x195.png
2023-04-18 12:15
13K
couverture-etude-de-cas-2021-logo-saaa-rd-merchandising-marketing-retail-logo-bubble-plan-245x184.png
2023-04-18 12:15
12K
couverture-etude-de-cas-2021-logo-saaa-rd-merchandising-marketing-retail-logo-bubble-plan-198x145.png
2023-04-18 12:15
9.4K
couverture-etude-de-cas-2021-logo-saaa-rd-merchandising-marketing-retail-logo-bubble-plan-100x70.png
2023-04-18 12:15
3.6K
couverture-etude-de-cas-2021-logo-saaa-rd-merchandising-marketing-retail-logo-bubble-plan-80x60.png
2023-04-18 12:15
2.9K
illustration-mieux-comprendre-scrum.png
2023-03-20 16:02
668K
illustration-mieux-comprendre-scrum-2048x474.png
2023-03-20 16:02
154K
illustration-mieux-comprendre-scrum-1536x355.png
2023-03-20 16:02
106K
illustration-mieux-comprendre-scrum-768x178.png
2023-03-20 16:02
45K
illustration-mieux-comprendre-scrum-640x400.png
2023-03-20 16:02
42K
illustration-mieux-comprendre-scrum-640x148.png
2023-03-20 16:02
36K
illustration-mieux-comprendre-scrum-485x360.png
2023-03-20 16:02
34K
illustration-mieux-comprendre-scrum-431x321.png
2023-03-20 16:02
30K
illustration-mieux-comprendre-scrum-528x122.png
2023-03-20 16:02
29K
illustration-mieux-comprendre-scrum-300x220.png
2023-03-20 16:02
19K
illustration-mieux-comprendre-scrum-260x195.png
2023-03-20 16:02
17K
illustration-mieux-comprendre-scrum-245x184.png
2023-03-20 16:02
16K
illustration-mieux-comprendre-scrum-198x145.png
2023-03-20 16:02
12K
illustration-mieux-comprendre-scrum-100x70.png
2023-03-20 16:02
5.3K
illustration-mieux-comprendre-scrum-80x60.png
2023-03-20 16:02
4.2K
illustration-mieux-comprendre-scrum-2911x673.png
2023-03-20 16:02
239K
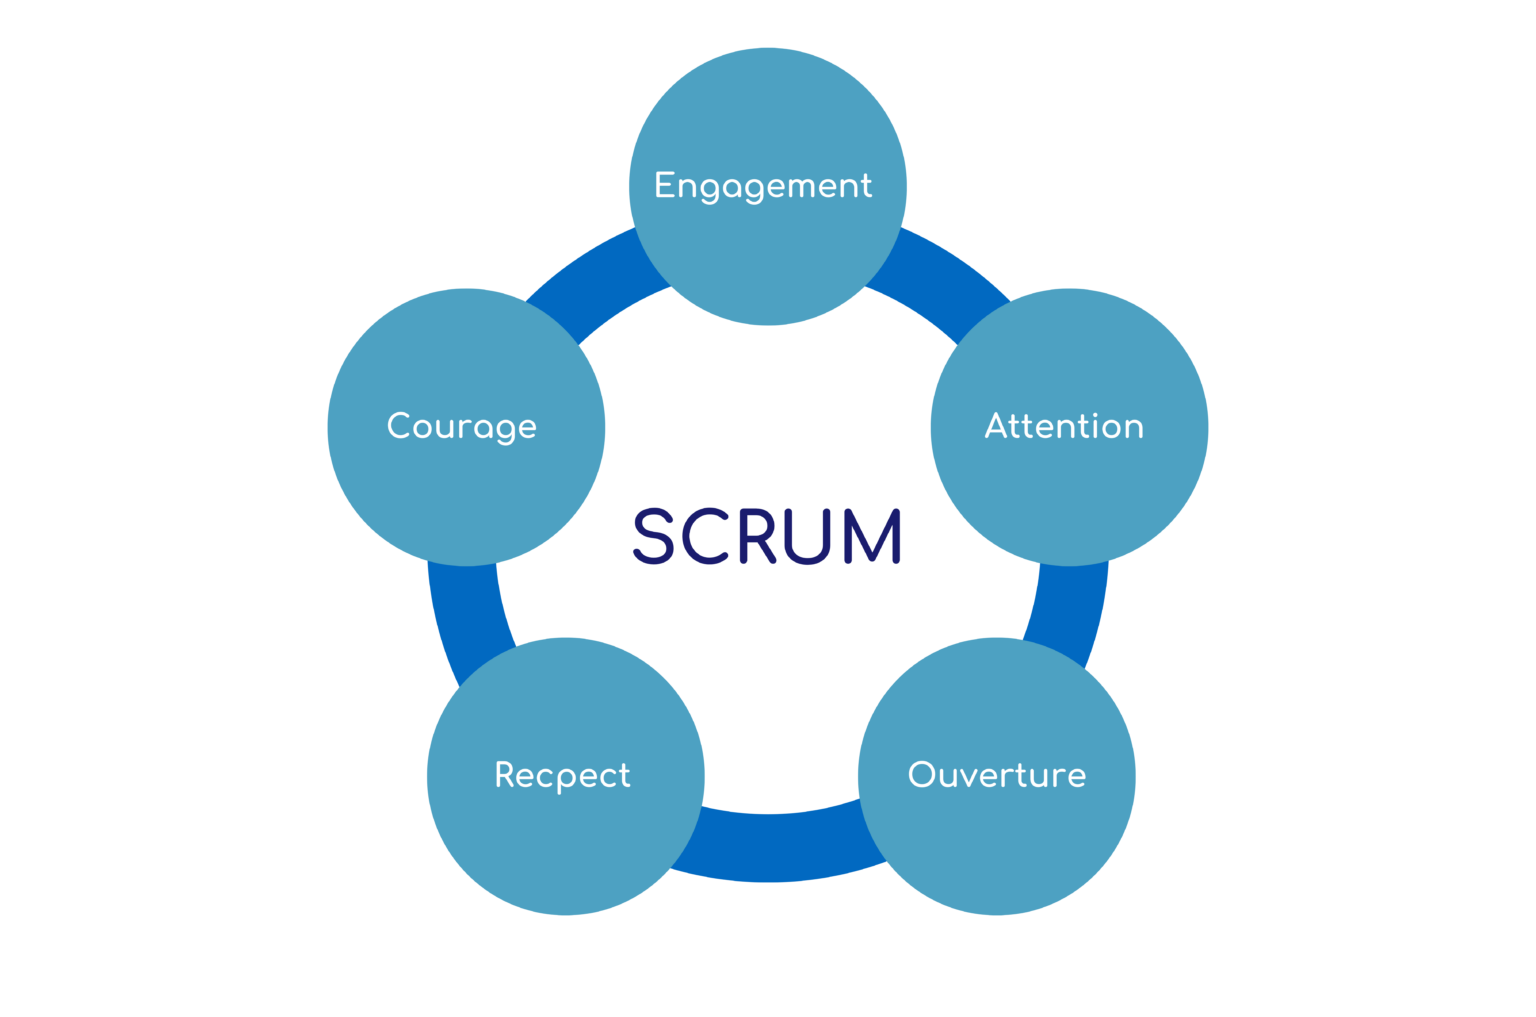
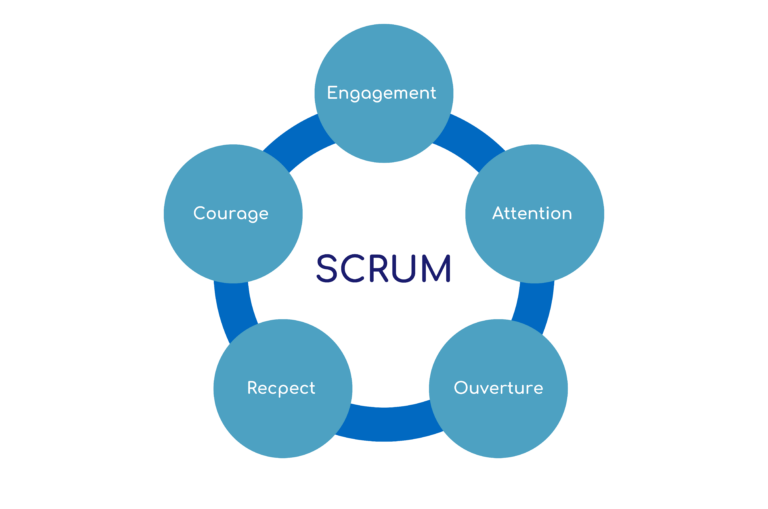
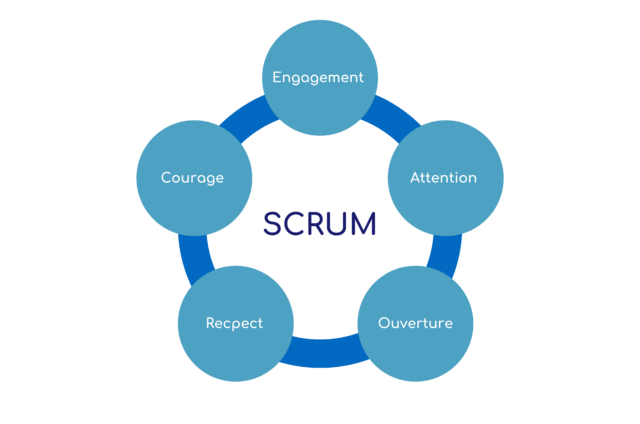
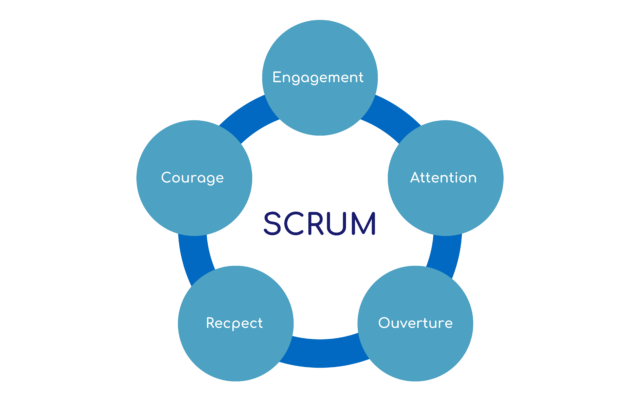
scrum-grands-preceptes.png
2023-03-20 15:57
429K
scrum-grands-preceptes-2911x1928.png
2023-03-20 15:57
177K
scrum-grands-preceptes-2048x1356.png
2023-03-20 15:57
113K
scrum-grands-preceptes-1536x1017.png
2023-03-20 15:57
78K
scrum-grands-preceptes-768x509.png
2023-03-20 15:57
34K
scrum-grands-preceptes-640x424.png
2023-03-20 15:57
28K
scrum-grands-preceptes-640x400.png
2023-03-20 15:57
27K
scrum-grands-preceptes-528x350.png
2023-03-20 15:57
22K
scrum-grands-preceptes-485x360.png
2023-03-20 15:57
23K
scrum-grands-preceptes-431x321.png
2023-03-20 15:57
20K
scrum-grands-preceptes-300x220.png
2023-03-20 15:57
12K
scrum-grands-preceptes-260x195.png
2023-03-20 15:57
11K
scrum-grands-preceptes-245x184.png
2023-03-20 15:57
9.7K
scrum-grands-preceptes-198x145.png
2023-03-20 15:57
7.4K
scrum-grands-preceptes-100x70.png
2023-03-20 15:57
3.1K
scrum-grands-preceptes-80x60.png
2023-03-20 15:57
2.7K
illustration-scrum-sprint-cycle.png
2023-03-20 15:53
224K
illustration-scrum-sprint-cycle-2911x1928.png
2023-03-20 15:53
224K
illustration-scrum-sprint-cycle-2048x1356.png
2023-03-20 15:53
217K
illustration-scrum-sprint-cycle-1536x1017.png
2023-03-20 15:53
149K
illustration-scrum-sprint-cycle-768x509.png
2023-03-20 15:53
59K
illustration-scrum-sprint-cycle-640x424.png
2023-03-20 15:53
46K
illustration-scrum-sprint-cycle-640x400.png
2023-03-20 15:53
46K
illustration-scrum-sprint-cycle-528x350.png
2023-03-20 15:53
36K
illustration-scrum-sprint-cycle-485x360.png
2023-03-20 15:53
36K
illustration-scrum-sprint-cycle-300x220.png
2023-03-20 15:53
19K
illustration-scrum-sprint-cycle-431x321.png
2023-03-20 15:53
31K
illustration-scrum-sprint-cycle-260x195.png
2023-03-20 15:53
16K
illustration-scrum-sprint-cycle-245x184.png
2023-03-20 15:53
15K
illustration-scrum-sprint-cycle-198x145.png
2023-03-20 15:53
11K
illustration-scrum-sprint-cycle-100x70.png
2023-03-20 15:53
4.7K
illustration-scrum-sprint-cycle-80x60.png
2023-03-20 15:53
3.9K
illustration-de-couverture-article-mieux-comprendre-scrum-2048x1356.png
2023-03-20 15:49
162K
illustration-de-couverture-article-mieux-comprendre-scrum-1536x1017.png
2023-03-20 15:49
111K
illustration-de-couverture-article-mieux-comprendre-scrum-768x509.png
2023-03-20 15:49
47K
illustration-de-couverture-article-mieux-comprendre-scrum-640x424.png
2023-03-20 15:49
38K
illustration-de-couverture-article-mieux-comprendre-scrum-640x400.png
2023-03-20 15:49
38K
illustration-de-couverture-article-mieux-comprendre-scrum-528x350.png
2023-03-20 15:49
30K
illustration-de-couverture-article-mieux-comprendre-scrum-485x360.png
2023-03-20 15:49
27K
illustration-de-couverture-article-mieux-comprendre-scrum-245x184.png
2023-03-20 15:49
12K
illustration-de-couverture-article-mieux-comprendre-scrum-431x321.png
2023-03-20 15:49
24K
illustration-de-couverture-article-mieux-comprendre-scrum-300x220.png
2023-03-20 15:49
16K
illustration-de-couverture-article-mieux-comprendre-scrum-260x195.png
2023-03-20 15:49
13K
illustration-de-couverture-article-mieux-comprendre-scrum-198x145.png
2023-03-20 15:49
9.5K
illustration-de-couverture-article-mieux-comprendre-scrum-100x70.png
2023-03-20 15:49
4.1K
illustration-de-couverture-article-mieux-comprendre-scrum-80x60.png
2023-03-20 15:49
3.2K
illustration-de-couverture-article-mieux-comprendre-scrum-2911x1928.png
2023-03-20 15:49
257K
illustration-de-couverture-article-mieux-comprendre-scrum.png
2023-03-20 15:49
747K
timeline-example-roadmap-infographic.png
2023-03-06 10:24
308K
timeline-example-roadmap-infographic-640x423.png
2023-03-06 10:24
172K
timeline-example-roadmap-infographic-640x400.png
2023-03-06 10:24
168K
timeline-example-roadmap-infographic-485x360.png
2023-03-06 10:24
128K
timeline-example-roadmap-infographic-300x220.png
2023-03-06 10:24
59K
timeline-example-roadmap-infographic-260x195.png
2023-03-06 10:24
49K
timeline-example-roadmap-infographic-768x507.png
2023-03-06 10:24
228K
timeline-example-roadmap-infographic-528x349.png
2023-03-06 10:24
128K
timeline-example-roadmap-infographic-431x321.png
2023-03-06 10:24
106K
timeline-example-roadmap-infographic-245x184.png
2023-03-06 10:24
45K
timeline-example-roadmap-infographic-198x145.png
2023-03-06 10:24
31K
timeline-example-roadmap-infographic-100x70.png
2023-03-06 10:24
10K
timeline-example-roadmap-infographic-80x60.png
2023-03-06 10:24
7.5K
management-visuel-bubble-plan.png
2023-03-02 14:14
262K
management-visuel-bubble-plan-2911x902.png
2023-03-02 14:13
361K
management-visuel-bubble-plan-2048x634.png
2023-03-02 14:13
226K
management-visuel-bubble-plan-1536x476.png
2023-03-02 14:13
155K
management-visuel-bubble-plan-768x238.png
2023-03-02 14:13
59K
management-visuel-bubble-plan-640x400.png
2023-03-02 14:13
65K
management-visuel-bubble-plan-640x198.png
2023-03-02 14:13
45K
management-visuel-bubble-plan-528x164.png
2023-03-02 14:13
35K
management-visuel-bubble-plan-485x360.png
2023-03-02 14:13
48K
management-visuel-bubble-plan-431x321.png
2023-03-02 14:13
41K
management-visuel-bubble-plan-300x220.png
2023-03-02 14:13
24K
management-visuel-bubble-plan-260x195.png
2023-03-02 14:13
20K
management-visuel-bubble-plan-245x184.png
2023-03-02 14:13
19K
management-visuel-bubble-plan-198x145.png
2023-03-02 14:13
14K
management-visuel-bubble-plan-100x70.png
2023-03-02 14:13
5.3K
management-visuel-bubble-plan-80x60.png
2023-03-02 14:13
4.1K
roadmap-outil-de-management-visuel-bubble-plan-640x400.png
2023-03-02 14:09
57K
roadmap-outil-de-management-visuel-bubble-plan.png
2023-03-02 14:09
108K
roadmap-outil-de-management-visuel-bubble-plan-2048x546.png
2023-03-02 14:09
189K
roadmap-outil-de-management-visuel-bubble-plan-1536x409.png
2023-03-02 14:09
129K
roadmap-outil-de-management-visuel-bubble-plan-768x205.png
2023-03-02 14:09
50K
roadmap-outil-de-management-visuel-bubble-plan-485x360.png
2023-03-02 14:09
43K
roadmap-outil-de-management-visuel-bubble-plan-300x220.png
2023-03-02 14:09
23K
roadmap-outil-de-management-visuel-bubble-plan-640x170.png
2023-03-02 14:09
37K
roadmap-outil-de-management-visuel-bubble-plan-260x195.png
2023-03-02 14:09
18K
roadmap-outil-de-management-visuel-bubble-plan-245x184.png
2023-03-02 14:09
17K
roadmap-outil-de-management-visuel-bubble-plan-198x145.png
2023-03-02 14:09
12K
roadmap-outil-de-management-visuel-bubble-plan-100x70.png
2023-03-02 14:09
4.5K
roadmap-outil-de-management-visuel-bubble-plan-80x60.png
2023-03-02 14:09
3.5K
roadmap-outil-de-management-visuel-bubble-plan-528x141.png
2023-03-02 14:09
28K
roadmap-outil-de-management-visuel-bubble-plan-431x321.png
2023-03-02 14:09
38K
saaa-etude-de-cas-optimisation-rd-768x598.png
2023-02-27 10:56
239K
saaa-etude-de-cas-optimisation-rd-640x498.png
2023-02-27 10:56
176K
saaa-etude-de-cas-optimisation-rd-640x400.png
2023-02-27 10:56
161K
saaa-etude-de-cas-optimisation-rd-528x411.png
2023-02-27 10:56
126K
saaa-etude-de-cas-optimisation-rd.png
2023-02-27 10:56
65K
saaa-etude-de-cas-optimisation-rd-485x360.png
2023-02-27 10:56
103K
saaa-etude-de-cas-optimisation-rd-431x321.png
2023-02-27 10:56
87K
saaa-etude-de-cas-optimisation-rd-300x220.png
2023-02-27 10:56
43K
saaa-etude-de-cas-optimisation-rd-260x195.png
2023-02-27 10:56
36K
saaa-etude-de-cas-optimisation-rd-245x184.png
2023-02-27 10:56
33K
saaa-etude-de-cas-optimisation-rd-198x145.png
2023-02-27 10:56
21K
saaa-etude-de-cas-optimisation-rd-100x70.png
2023-02-27 10:56
6.7K
saaa-etude-de-cas-optimisation-rd-80x60.png
2023-02-27 10:56
5.3K
saaa-shopexpertvalley-salon-popai-1536x816.png
2023-02-27 10:52
638K
saaa-shopexpertvalley-salon-popai.png
2023-02-27 10:52
145K
saaa-shopexpertvalley-salon-popai-640x400.png
2023-02-27 10:52
162K
saaa-shopexpertvalley-salon-popai-640x340.png
2023-02-27 10:52
137K
saaa-shopexpertvalley-salon-popai-485x360.png
2023-02-27 10:52
115K
saaa-shopexpertvalley-salon-popai-300x220.png
2023-02-27 10:52
50K
saaa-shopexpertvalley-salon-popai-260x195.png
2023-02-27 10:52
40K
saaa-shopexpertvalley-salon-popai-245x184.png
2023-02-27 10:52
36K
saaa-shopexpertvalley-salon-popai-198x145.png
2023-02-27 10:52
25K
saaa-shopexpertvalley-salon-popai-100x70.png
2023-02-27 10:52
7.6K
saaa-shopexpertvalley-salon-popai-80x60.png
2023-02-27 10:52
5.5K
saaa-shopexpertvalley-salon-popai-768x408.png
2023-02-27 10:52
186K
saaa-shopexpertvalley-salon-popai-528x280.png
2023-02-27 10:52
99K
saaa-shopexpertvalley-salon-popai-431x321.png
2023-02-27 10:52
94K
saaa-etude-de-cas-merchandising-retail-rd.png
2023-02-27 10:43
258K
saaa-etude-de-cas-merchandising-retail-rd-640x400.png
2023-02-27 10:43
296K
saaa-etude-de-cas-merchandising-retail-rd-640x234.png
2023-02-27 10:43
183K
saaa-etude-de-cas-merchandising-retail-rd-485x360.png
2023-02-27 10:43
201K
saaa-etude-de-cas-merchandising-retail-rd-300x220.png
2023-02-27 10:43
80K
saaa-etude-de-cas-merchandising-retail-rd-1536x562.png
2023-02-27 10:43
1.0M
saaa-etude-de-cas-merchandising-retail-rd-260x195.png
2023-02-27 10:43
63K
saaa-etude-de-cas-merchandising-retail-rd-245x184.png
2023-02-27 10:43
57K
saaa-etude-de-cas-merchandising-retail-rd-198x145.png
2023-02-27 10:43
38K
saaa-etude-de-cas-merchandising-retail-rd-100x70.png
2023-02-27 10:43
11K
saaa-etude-de-cas-merchandising-retail-rd-80x60.png
2023-02-27 10:43
8.2K
saaa-etude-de-cas-merchandising-retail-rd-768x281.png
2023-02-27 10:43
259K
saaa-etude-de-cas-merchandising-retail-rd-528x193.png
2023-02-27 10:43
130K
saaa-etude-de-cas-merchandising-retail-rd-431x321.png
2023-02-27 10:43
159K
roadmap-exemple-illustration-du-blog.png
2023-02-21 16:06
251K
roadmap-exemple-illustration-du-blog-1536x1094.png
2023-02-21 16:06
342K
roadmap-exemple-illustration-du-blog-768x547.png
2023-02-21 16:06
134K
roadmap-exemple-illustration-du-blog-640x456.png
2023-02-21 16:06
105K
roadmap-exemple-illustration-du-blog-640x400.png
2023-02-21 16:06
92K
roadmap-exemple-illustration-du-blog-528x376.png
2023-02-21 16:06
79K
roadmap-exemple-illustration-du-blog-485x360.png
2023-02-21 16:06
71K
roadmap-exemple-illustration-du-blog-300x220.png
2023-02-21 16:06
34K
roadmap-exemple-illustration-du-blog-260x195.png
2023-02-21 16:06
27K
roadmap-exemple-illustration-du-blog-245x184.png
2023-02-21 16:06
25K
roadmap-exemple-illustration-du-blog-198x145.png
2023-02-21 16:06
18K
roadmap-exemple-illustration-du-blog-100x70.png
2023-02-21 16:06
6.8K
roadmap-exemple-illustration-du-blog-80x60.png
2023-02-21 16:06
5.2K
roadmap-exemple-illustration-du-blog-431x321.png
2023-02-21 16:06
61K
Apache/2.4.66 (Ubuntu) Server at bubbleplan.net Port 443